#Tutorial Google Maps
Explore tagged Tumblr posts
Visit Tumblr Blog
Explore Tumblr blogs with no restrictions, modern design and the best experience.
Last Seen Tumblr Blogs


Fun Fact
Tumblr Inc. is using 66 technologies for its website.
Text
Mengungkap Rahasia: Cara Mengukur Jarak di Google Maps dengan Mudah
Cara Mengukur Jarak di Google Maps – Pernahkah Anda bertanya-tanya tentang betapa akuratnya kita dapat mengukur jarak antar dua lokasi menggunakan Google Maps? Teknologi canggih yang ditanamkan dalam aplikasi ini memungkinkan pengguna untuk dengan mudah mengetahui seberapa jauh suatu tempat dari lokasi lainnya. Dalam artikel ini, kita akan membahas secara rinci “Cara Mengukur Jarak di Google…

View On WordPress
#Cara Mengukur Jarak#Fitur Pengukuran Google Maps#Google Maps#Mengukur Jarak Tempuh#Navigasi Jarak#Panduan Penggunaan Google Maps#Pengukuran Jarak di Aplikasi Peta#Peta Online#Tips Google Maps#Tutorial Google Maps
0 notes
Text
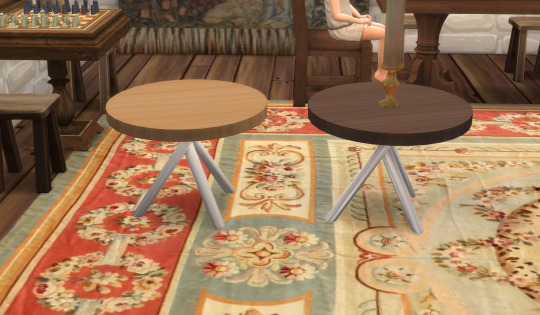
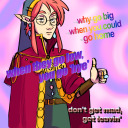
Guess who's finally learning to bake textures in blender!
(Left is my old texture made in gimp, right is the new one made with blender.)
#sims 4#simblr#my cc#blender#did i have to redo the uv mapping of the legs? yes#did i spend a bunch of time pausing the tutorial to google where the right buttons were because my version of blender is newer? also yes#do I still like my other way of doing things a bit better? kinda#i need to fiddle with the spec a bit but i might be able to finish this silly little table#is this a medieval save that has no place testing a contemporary table? also yes but it was convenient
3 notes
·
View notes
Text
Mastering Local Citation is the Key to Local Success
Looking to boost your local SEO and outrank competitors in your area?

Local citations are the foundation of strong local SEO—and I’m here to help you master them.
With my service, you’ll get:
🔹 Manually created local citations on high-authority directories 🔹 100% NAP consistency (Name, Address, Phone) 🔹 Submission to niche-specific and geo-targeted platforms 🔹 A full report with login details and live links (if available) 🔹 No duplicates—only fresh, clean listings
Whether you're a local shop, service provider, or multi-location brand, I'll ensure your business gets the exposure it deserves.
#local citations#map citation#local seo citations chicago#local seo citations bluebook#map citation seo#google map citation#local seo#local seo citations chicago 2022#local seo citations bangla tutorial#local seo strategy#google map citation tutorial#local seo tutorials#local seo agency#local seo complete course#google map citations for local seo#local seo full course#local seo services#local seo vs organic seo#local seo ranking factors 2022
0 notes
Text
youtube
Learn how to add a Google Map to your WordPress website with this full guide. It's easy and will enhance your site's usability!
#how to add google map in wordpress#add google maps on wordpress website#embedding google map in wordpress#wordpress tutorial#adding google maps to wordpress#adding google maps to your wordpress website#how to add google map in your wordpress website#how to add google map in wordpress without plugin#how to add google map on wordpress website#add google maps to wordpress#embed google maps in wordpress#add google maps in wordpress#how to add google map in wordpress website#Youtube
0 notes
Video
youtube
Google Maps Gets Smarter
#youtube#Google maps ai smarter tutorial tips tricks educational features new bob3160 lecturer presenter
0 notes
Text
youtube
#good news#news#videos#google earth#google earth tutorial#google maps#scary google earth#google earth live#google earth scary#google earth finds#google earth secrets#how to use google earth#timelapse in google earth#google map#google earth tips#google earth ruler#using google earth#google earth basics#google earth tricks#google earth studio#google street view#google earth download#google earth contours#places on google earth#google earth to autocad#Youtube
0 notes
Text
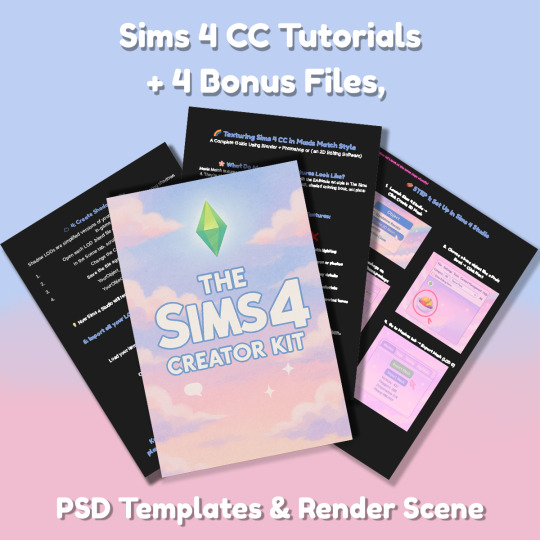
Sims 4 CC Kit — Make Your Own Lights, Decor, Clutter & Textures
Ever wanted to create Sims 4 clutter or decor CC but got stuck?
This kit is for you.
It’s a step-by-step guide that shows you how I make my own Sims 4 decor CC — lights, clutter, textures — in a way that I found works for me. You get guides, cheatsheets, templates, and my personal workflow that I’ve figured out through trial & error.
This probably isn’t the “proper” way of creating CC — but it’s how I learned, and it works and I use it every single time I create something new.
⚠️ Just to be clear:
This is a written tutorial kit, not a video or image course.
BUT — I’ve included some visuals, some screenshots & cheatsheets to help you follow along but its alot of written stuff. It would also be beneficial for you to have some basic knowledge of blender.
✅ What You Get:
Decor, clutter, lights CC Creation Guide
Shadow Mesh Tutorial
Mesh Cleanup Workflow
LOD Creation Steps
Maxis Match Texturing Cheat Sheet
Alpha Textures Basics
Vertex Paint for Lights Guide
Custom Thumbnail Tutorial
Normal & Specular Map Basics
Blender Basics Recap
Sims 4 Studio Quick Fix Cheatsheet
Blender Hotkeys Cheatsheet
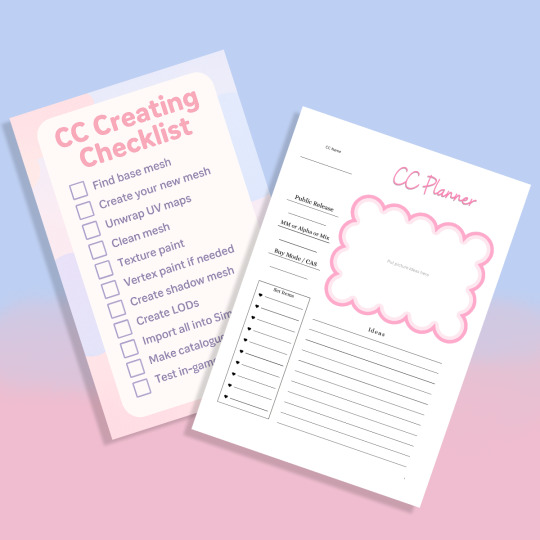
CC Planner to organize your ideas
CC Creating Checklist
PSD Thumbnail Templates (Decor)
Blank Normal & Specular Maps
Blender Render Setup File for Catalog Thumbnails
Texture Tips & Tricks
🎯 Why You’ll Love This:
No fluff — real steps, real help
Written for beginners who know basic Blender but need a hand
Includes a little bit of visual guides, printables & templates
Saves you HOURS of googling random problems
Helps you actually finish your CC & get it in-game
🖤 This is for you if:
You know basic Blender stuff (grab, rotate, edit mode) Got 3D Models you want to put into The Sims 4
You want to make clutter, decor CC and lights (not clothes or CAS yet)
You’re tired of tutorials that make you more confused
PS: Accessories & Clothing Creator Kits are coming soon.
If you get stuck, you can always join my Discord
(link’s on www.simmerkate.com).
Get Here (xx)
181 notes
·
View notes
Text

As a thank you for so many new followers, here's a brand new edition of my editing resources masterposts ✨ (you can find the previous editions here). Make sure you like or reblog the posts below if they’re from other blogs to support their creators! A friendly reminder that some of these are free for personal use only, so be sure to read the information attached to each resource to verify how they can be used.
Textures & Things:
Collage Kits from @cruellesummer that I find myself using basically every single day
Taylor Swift Wax Seals from @breakbleheavens that I also use literally every day
Rookie Magazine Collage Kits (1, 2, 3, 4, 5, 6, 7, 8, 9, 10)
Scribble Textures & Cross-Outs (1, 2, 3)
GIF Overlays (1, 2, 3)
Film Grain & Noise Textures (1, 2, 3)
Paper Textures (1, 2, 3, 4, 5, 6, 7, 8)
PNG Overlays (Paper, Flowers, Clouds, Stickers, Lips, Vintage Paper, Misc. Symbols)
Halftone, Scan Line, & VHS Noise Textures (1, 2, 3, 4)
VHS Tape Textures by @cellphonehippie
Misc. Texture Packs (1, 2, 3, 4, 5, 6, 7, 8)
Photoshop Effects (Halftone Text Effect, Chrome Effect, Glitch Effect, Ink Edge Effect, Photo Morph Effect)
Fonts:
Badass Fonts (free fonts designed by womxn 🤍)
Open Foundry Fonts
Free Faces
Uncut Free Typefaces
Some Google Fonts I Like: Instrument Serif, DM Sans, EB Garamond, Forum, Pirata One, Imbue, Amarante
Some Adobe Fonts I Like: New Spirit, Ambroise, Filmotype Yukon, Typeka, Big Caslon CC (TTPD Font!)
Some Pangram Pangram Fonts I Like: Editorial Old, Neue World Collection, Eiko, PP Playground
Fonts In The Wild (font-finding resource)
Tutorials & Resources:
Comprehensive Rotoscoping Tutorial (Photoshop + After Effects, great for beginners!) by @antoniosvivaldi
Rotoscoping & Masking Tutorial (After Effects) by @usergif
Texture Tutorial for GIFs by @antoniosvivaldi
Color Control PSD by @evansyhelp (to enhance, isolate, or lighten specific colors)
Cardigan Music Video PSD by @felicitysmoak
Picspam Tutorial by @kvtnisseverdeen
Moving GIF Overlay Tutorial by @rhaenyratargaryns
GIF Overlay Tutorial (+ downloadable overlays!) by @idsb
Icon & Header Tutorial by @breakbleheavens
GIF Blending Tutorial by @jakeperalta
Split GIF Tutorial by @mithrandirl
Guide to Coloring Yellow-Tinted Shots by @ajusnice
Slow Motion After Effects Tutorial (useful for GIFs!)
Gradient Map Tutorial by me!
Misc:
How to Make Your Own Textures by @sweettasteofbitter
How to Report Tumblr Reposts of Your Work by @fatenumberfor
Tips for Accessible Typography
916 notes
·
View notes
Text
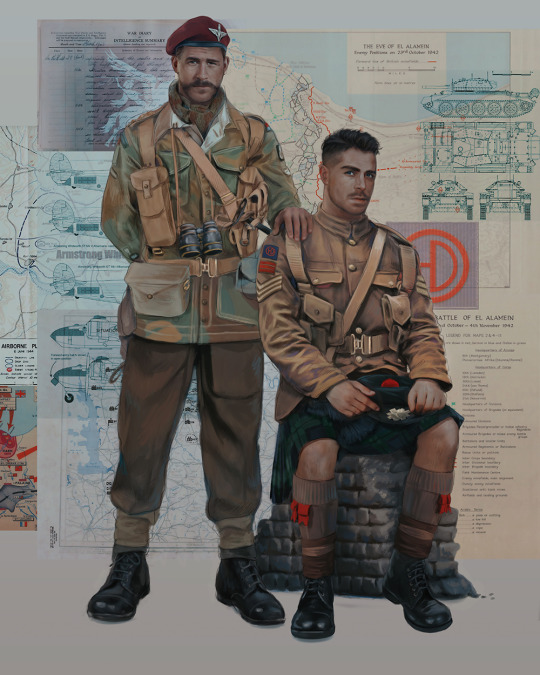
Ok! I've finally decided to put together a (somewhat) comprehensive tutorial on my latest art~
Please enjoy this little step-by-step 💁♀️
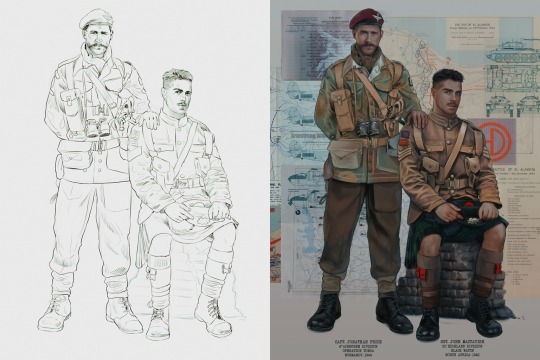
First things first--references!
Now I'm not saying you have to go overboard, but I always find that this is a crucial starting point in any art piece I intend on making. Especially if you're a detail freak like me and want to make it as realistic as possible 🙃
As such, your web browser should look like this at any given point:

Since this is a historical piece, it means hours upon hours of meaningless research just to see what color the socks are, but...again. that isn't, strictly, necessary 😅
Once I've compiled all my lovely ref pics, I usually dump them into a big-ass collage ⬇️
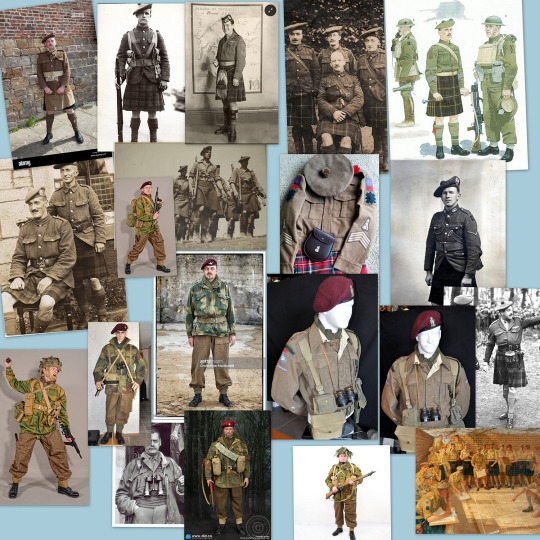
(I will end up not using half of these, alas :'D)
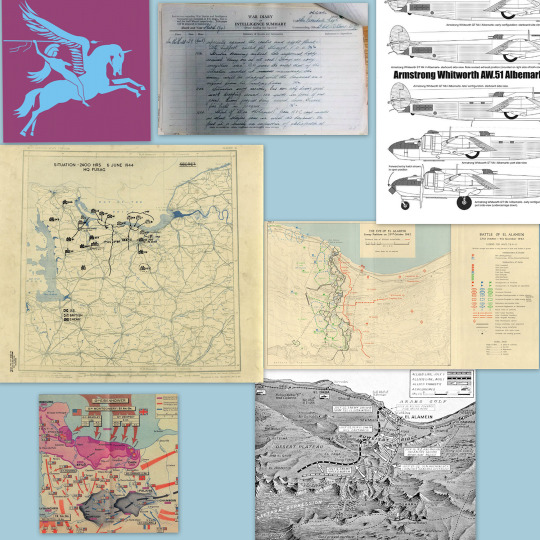
Another reference search for background material, and getting to showcase our models of choice for this occasion~
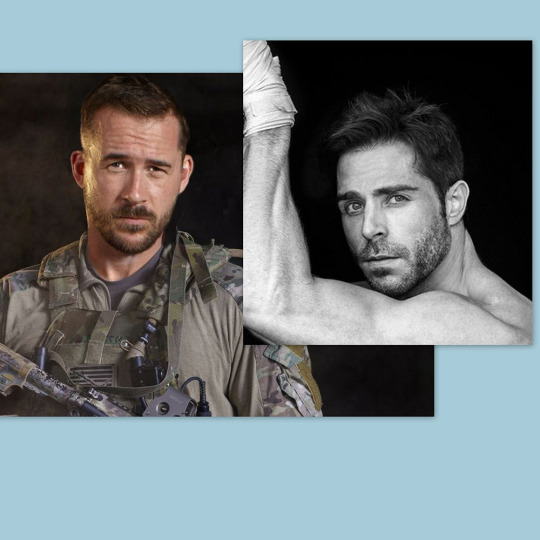
When picking a reference for an actor or model, the main thing I keep in mind (besides prettiness 🤭) is lighting and orientation. Because I already kinda know what pose I'm gonna go with for this piece, I can look for specific angles that might fit the criteria. I should mention that I am a reference hound, and my current COD actor ref folder looks like this:

Also keep in mind, if you're using a ref that you need to flip, make sure you adjust accordingly. This especially applies to clothing, as certain things like pants zippers and belt buckles can be quite specific ☝️
Now that we've spent countless hours googling, it's time to start with a rough sketch:
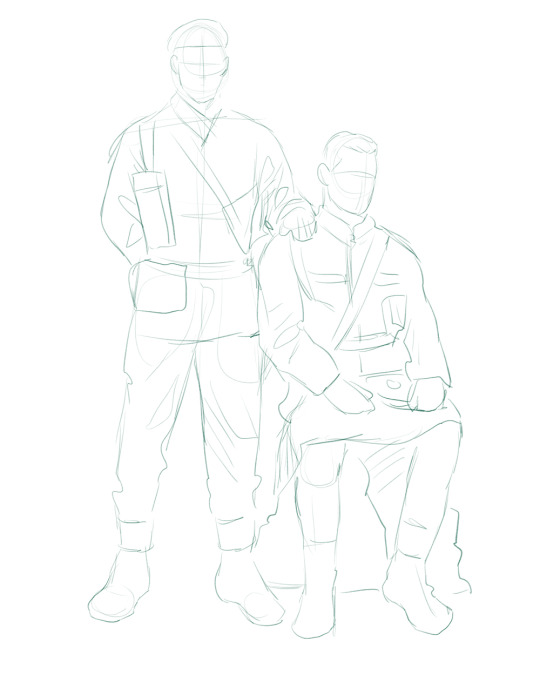
It doesn't have to be pretty, folks, just a basic guideline of where you want the figures to be.
The next step is to define it more, and I know this looks like that 'how to draw an owl' meme, but I promise--getting from the loose sketch above to below is not that difficult.
Things to keep in mind are--don't go too in-depth with the details, because things are still subject to change at this point. In terms of making a suitable anatomically-correct sketch, I would suggest lots of studying. This doesn't even have to be things like figure drawing, I genuinely look at people around me for inspiration all the time. Familiarize yourself with the human form, and things like weight, proportions, posing will seem a little more feasible.
It's also important at this stage to consider your composition. Remember to flip the canvas frequently to make sure you're not leaning to one side too often. I'm sure something can be said for the spiral fibonacci stuff, which I don't really try to do on purpose, but I think keeping things like symmetry and balance in mind is a good start ✌️

Next step is just blocking in the figures. Standard. No fuss 👍
Now onto the background!
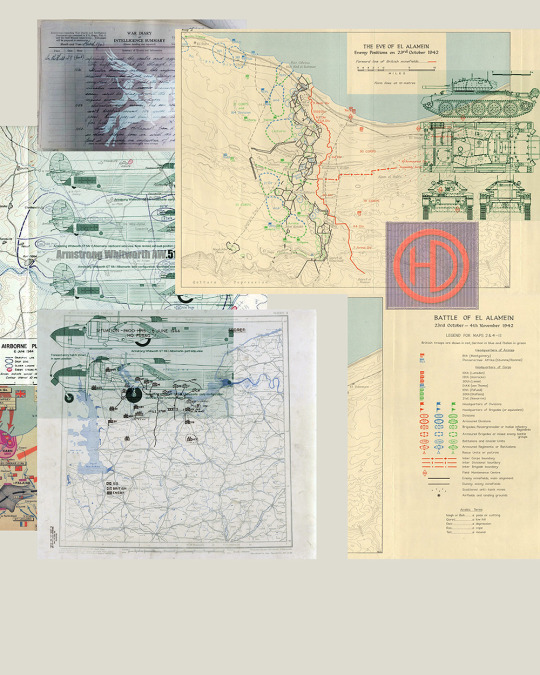
It's frankly hilarious how many people thought I was *hand-drawing* these maps and stuff 😂😂 I cannot even begin to comprehend how insanely difficult that would be. So yeah, we're just taking the lazy copy and paste way out 🤙
I almost always prepare my backgrounds first, and this is mostly to get a general color scheme off the bat. For collage work, it's really just a matter of trial and error, sticking this here, slapping this there, etc. I like to futz around with different overlay options until I've found a nice arrangement. Advice for this is just--go nuts 🤷♀️
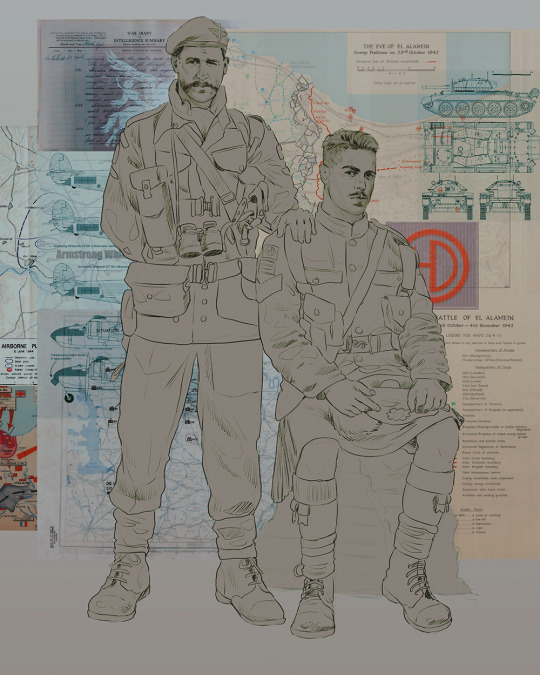
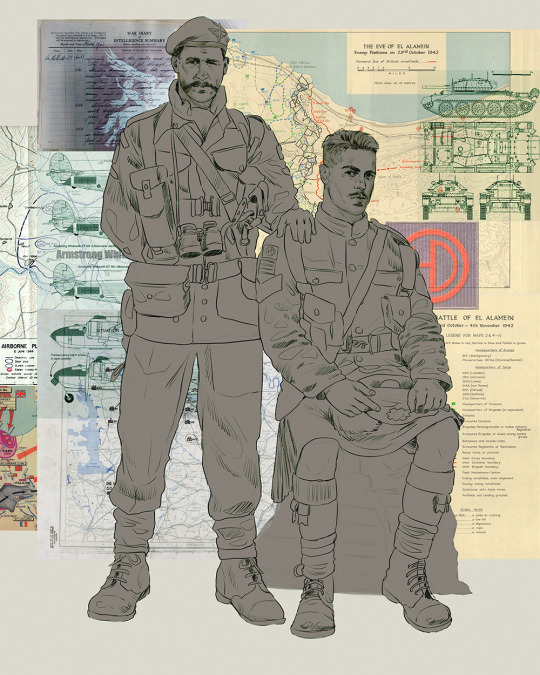
Next, I add a few color adjustments. I tend to make at least 2 colors pop in an art piece, and low and behold, they usually tend to be red and blue ❤️💙There's something about warm/cool vibes, idk man..
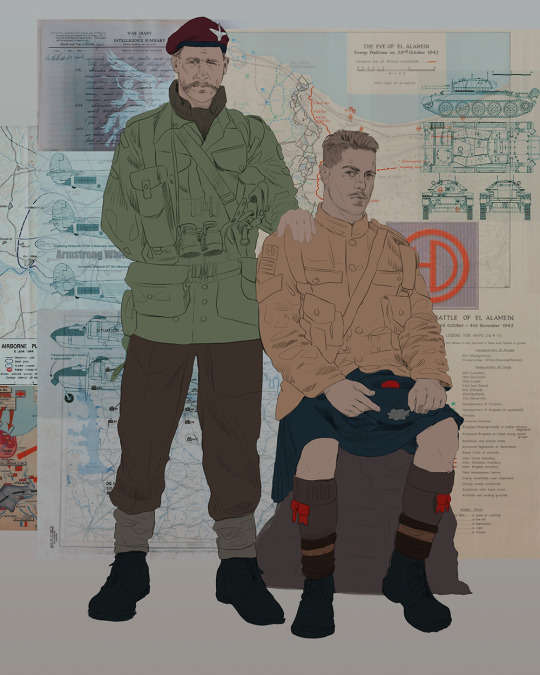
Now we move on to coloring the figures. This is just a basic block and fill, not really defining any of the details yet.
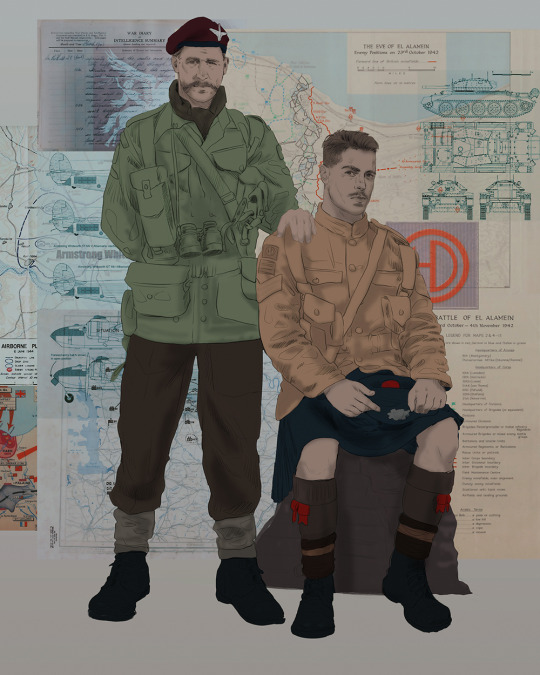
Next, we add some cursory values. Sloppy airbrush works fine, it'll look better soon I promise 🙏
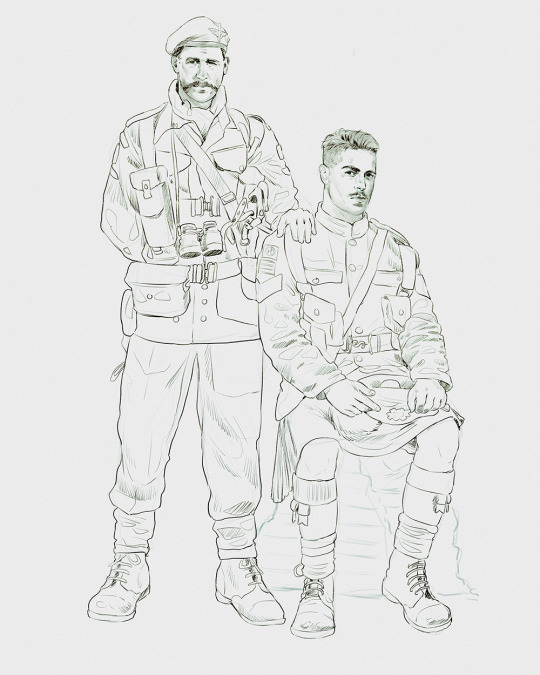
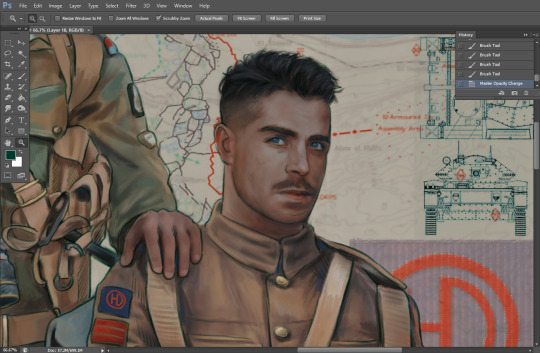
And now--rendering!
I know a lot of beginner artists are intimidated by rendering, and I can totally understand why. It's just one of those things you have to commit to 💪
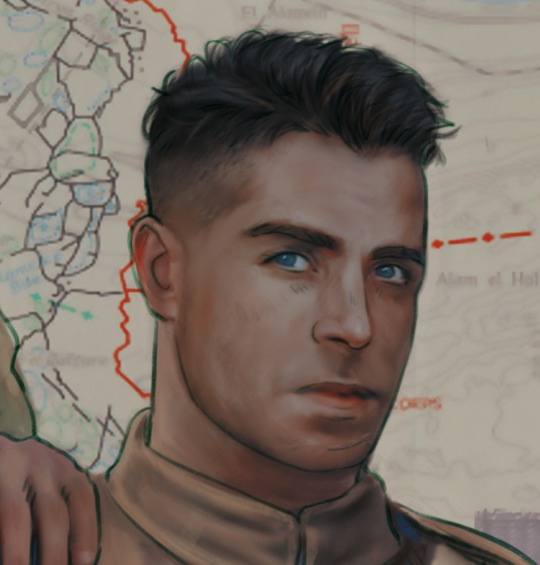
I've decided to show a brief process of rendering our dear Johnny's face here:
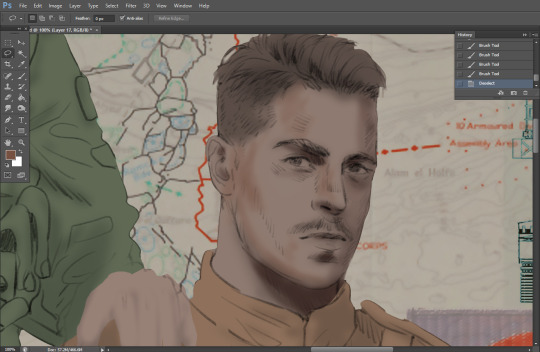
Starting off, I usually rely on the trusty airbrush just to get some color values going. Note--I've kept my sketch layer on top, but feel free to turn it on and off as you work, so as to not be too bound to the sketch. For now, it's just a guideline.
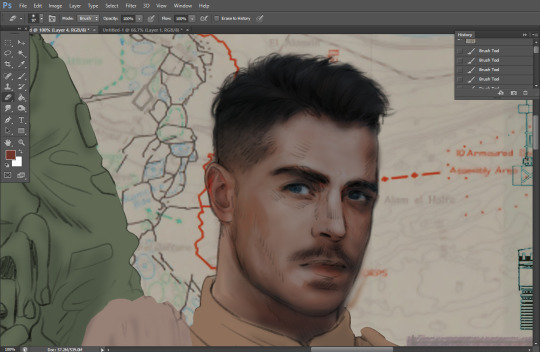
This next stage may look like a huge jump, but it's really just adding more to the foundation. I try to think of it like putting on make-up in a way~ Adding contours, accentuating highlights. This is also where I start adding in more saturation, especially around areas such as ears, nose and lips. Still a bit fuzzy at this point, but that's why we keep adding to it 💪
A boy has appeared! See--now I've removed most of the line layer, and it holds up on its own. I'll admit that in order to achieve this realistic style, you'll need lots and lots of practice and skill, which shouldn't be discouraging! Just motivate yourself with the prospect of getting to look at pretty men for countless hours 🙆♀️
I'll probably do a more in-depth explanation about rendering at some point, but let's keep this rolling~

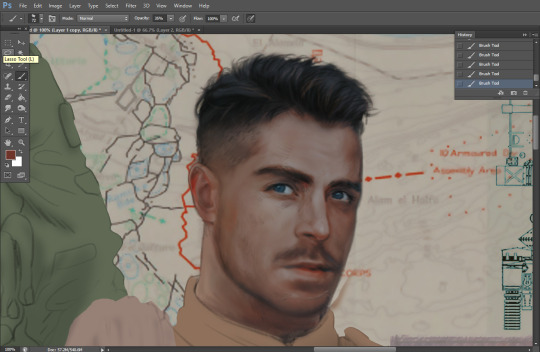
Moving forward is just a process of adding to the figures bit by bit. I do lean towards filling in each section from top to bottom, but you can feel free to pop around to certain parts that appeal to you more. I almost always do the faces first though, because if they end up sucking, I feel less guilty about scrapping it 😂 But no--I think he's pretty enough to proceed 😚
They're coming together now 🙆♀️ Another helpful tip--make sure you reuse color. By that, I mean--try to incorporate various colors throughout your piece, using the eyedropper tool to keep a consistent palette. I try to put in bits of red and blue where I can
Here they are fully rendered! Notice I've made a few subtle changes from the sketch, like adjusting the belt buckles because I made a mistake 😬 Hence why you shouldn't put too much stock in your initial sketch~
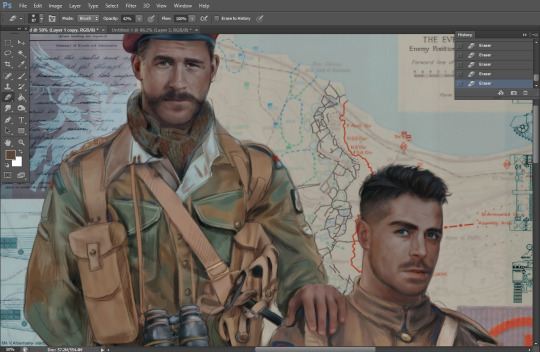
The next step is more of a stylistic choice, but I usually go over everything with an outline, typically in a bright color like green. Occasionally, I can just use my initial line layer, but for this, I've made a brand new, cleaner line 👍
And the final step is adjusting the color and adding some text:
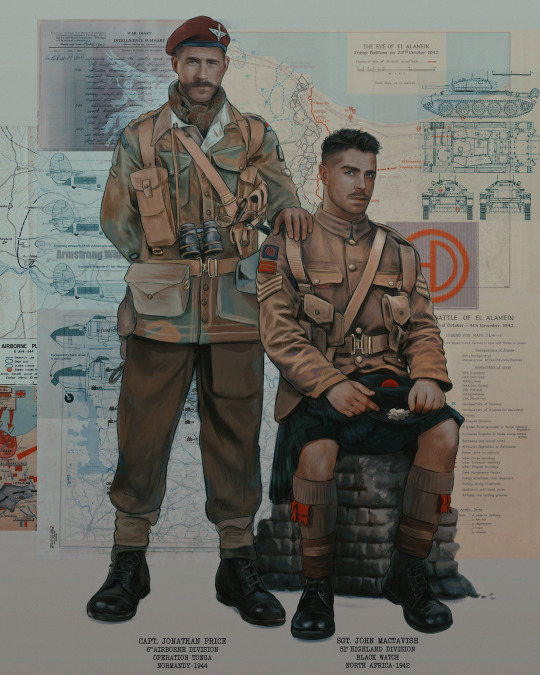
Tada!! It's done!
All in all, this took me the better part of a week, but I have a lot of free time, so yeah ✌️
I hope you appreciated that little walkthrough~ I know people have been asking me how I do my art, but the truth is--I usually have no clue how to explain myself 😅 So have this half-assed tutorial~
As a bonus, here is a cute (cursed) image of Johnny without his mustache:
A baby, a literal infant child !!! who put this wee bairn on the front lines ??! 😭
Anyway! peace out ✌️
#tutorial#my art#art tutorial#since people have been asking#I remembered to save my process from this latest work~#enjoy 🙆♀️
1K notes
·
View notes
Note
HII could you do transjapanese tips?
TRANSJAPANESE TIPS ꧂

- consume japanese media!! anime, games, etc
- watch/read things in japanese
- join japanese social medias, discord servers, anywhere you can talk to people
- speak out about japanese social issues!! theyre your issues now!!
- japanese celebrations and holidays and rituals!!
- japanese fashion!! there are SOO many types of fashions and pinterest and tiktok are amazing resources
- research ancient japanese culture, mythology, and folklore!!
- learn the language!! even just simple words!!
- japanese speech patterns!! men tend to speak more abrupt and women tend to speak softer and things like that
- japanese mannerisms/behaviors!! refrain from interrupting others, be humble, apologize, give gifts, receive gifts gracefully, “kenpai!“, “itadakimasu!“
- japanese accent!! look up videos for that :)
- japanese religion!! shinto and buddhism are two major ones
- go to japan in google maps street view
- japanese room decor!!
- buy from japanese stores!!
- pretend youre cis japanese!! you can make a social media account for it and everyrhing
- japanese music!!
- japanese crafts!! knot art, origami, and more!!
- japanese makeup!! look at tutorials :)
- eyelid tape for monolid!! dont just pull back your eyes with tape, youll get wrinkles. specifically use eyelin tape.
- japanese hair care!! look at tutorials :)
#transid#trace#transrace#transjapanese#transid euphoria#transid transition#transid tips#transid community#transx#transx safe#transx community#pro transx#transx pride#transx positivity
213 notes
·
View notes
Text
Twine/SugarCube ressources
Some/most of you must know that Arcadie: Second-Born was coded in ChoiceScript before I converted it to Twine for self-publishing (for various reasons).
I have switched to Ren'Py for Cold Lands, but I thought I would share the resources that helped me when I was working with Twine. This is basically an organized dump of nearly all the bookmarks I collected. Hope this is helpful!
Guides
Creating Interactive Fiction: A Guide to Using Twine by Aidan Doyle
A Total Beginner’s Guide to Twine
Introduction to Twine By Conor Walsh (covers Harlowe and not SugarCube)
Twine Grimoire I
Twine Grimoire II
Twine and CSS
Documentation
SugarCube v2 Documentation
Custom Macros
Chapel's Custom Macro Collection, particularly Fairmath function to emulate CS operations if converting your CS game to Twine
Cycy's custom macros
Clickable Images with HTML Maps
Character pages
Character Profile Card Tutorial
Twine 2 / SugarCube 2 Sample Code by HiEv
Templates
Some may be outdated following Twine/SugarCube updates
Twine/Sugarcube 2 Template
Twine SugarCube template
Twine Template II
Twine Template by Vahnya
Sample Code and more resources
A post from 2 years ago where I share sample code
TwineLab
nyehilism Twine masterpost
How to have greyed out choices
idrellegames's tutorials
Interactive Fiction Design, Coding in Twine & Other IF Resources by idrellegames (idrellegames has shared many tutorials and tips for Twine, browse their #twine tag)
How to print variables inside links
How do I create a passage link via clicking on a picture
App Builder
Convert your Twine game into a Windows and macOS executable (free)
Convert your Twine game into a mobile app for Android and iPhone (90$ one-time fee if memory serves me right) // Warning: the Android app it creates is outdated for Google Play, you'll need to update the source code yourself
252 notes
·
View notes
Note
Hello.
What are your most used references and choices (in medium etc) for studying? Also do you study regularly or is it in a "this time i want to focus on X" fashion?
I'm confident in my skills but it has been long since i actually grinded for them. I'm both in need of a guide and curious about what you do.
Thanks in advance.
Hi! Thank you for this inquiry cause hooo am I eager to yap about practice.
So, as for references and info, my most used resources are:
- Sketchfab, has anything from meticulous anatomical models to most random 3d scans.
- Line of Action, timed sketching as a warmup. - Google maps! Environment warmup.
- Pinterest is heaven, but you have to curate the quality yourself. It can be turned into the most valuable visual library or a landfill of AI slop and disposable tutorials.
As for the medium, I try to balance traditional/digital sessions. Most knowledge transfers between them well, but certain skills need extra time (colors work differently, pen sketching requires more focus and planning, etc). Even though digital art is my domain, I need to have a good chunk of traditional practice. It’s less forgiving, sure, but much more engaging. The feel, the smell, the sound. Besides, I rarely share traditional stuff, so there’s less pressure to make it “good”.
I used to study consistently years ago, but mental health + skill plateau took their toll. The further you go, the more subjects add up, the less obvious your progress is. As a beginner, I had a simple routine - a bunch of gesture studies, then color palettes, then some environments, rinse and repeat. Did challenges like 365 sketching days, Figuary, Huevember etc. But as I learned to see more, it became overwhelming. Like, okay, today’s an anatomy session. Do I focus on quick gestures? Or maybe delve into 1 h. lecture about back muscles? Different body types maybe?..
Combined with the amount of stuff I need to draw beside that, I can’t keep up with a consistent routine. This is where the “focus on X" approach saves me. I take notice of the subject that causes the most trouble at a given moment and pick up an exercise for it. BUT remember I’m too burned out to come up with a practice plan every time. To navigate art theory better, I boiled it down to an octagon of fundamentals, with more subjects branching off them (pic attached). Feeling stiff about composition? Go to a respective section, do a couple exercises, feel better.
A grindy version of it would be to go through the whole octagon lol. Wish I had a whole year dedicated to studies only, I’d test and perfect this system.


75 notes
·
View notes
Text
TS2 CC downloaders & creators discussion recap
Under the cut is a recap of the feedback gathered from the comments, community replies and reblogs on this thread. Thank you for taking the time to give your input! I tried to organize everything clearly in categories, with what was most often brought up at the top of each. I hope I didn’t forget anything. If I did, or you feel I didn't do your point justice, or you didn’t get a chance to say your piece, feel free to comment (I can always make edits). The text in brackets [] is my own remarks that I'm adding to the report.
About CC in general:
The people clamored for clear swatches/pictures that show which file corresponds to which recolor, so we can pick and choose what to keep.
Many people would like creators to put their usernames in their file names (or object descriptions) so they are easier to trace back to later. Two creators had counterpoints to this. One who has a long username said: “as a creator, I don't like to be told how I should name my files (besides identifying the thing clearly, which I think we really should do). If I've made the effort to make a thing, take previews, upload it, write the post etc. Just spend 5 seconds of your life renaming the file to whatever is convinient to you, I'm not going to add 16 characters to each of my files to include my username (I still think that longer names = longer loading time).” The other creator said: “As a creator, I don't want to put my full username in tooltips (just SB) because some hair names are quite long and I do not have the time to re tooltip the names.”
On the topic of file names, many people agreed that creators should not put special characters and spaces in their file names, to optimize loading times. One creator clarified: “the filenames should always have _ instead of spaces, as apparently this allows the game to load them easier/faster [...] underscores should be the only kind of special character in them” [use the Bulk Rename Utility - see tutorial by @ilovethesims2cc].
Still on file names, a Mac user said they dislike when file names are too long because apparently long file names are enough for Macs to shit themselves [sorry if I misunderstood, never had a Mac].
Several people mentioned disliking poorly optimized CC (one person listed: “bulky for no reason, unused bump maps, comically large or duplicated textures, things that could easily be repo'd but are not”), one person pointed out: “There is no reason a TS2 object needs a texture bigger than 1024x1024 unless it’s a special case like a skybox.”
One person said they dislike when a CC post lacks basic text info about what the download is. On this note, another person said they dislike when a creator isn’t clearly stating what mesh their recolors are for.
Two people asked that creators state their stuff’s polycounts.
Two people said they dislike when the recolors for a piece of CC are only available merged together, as they want to be able to easily choose which they want to keep. On the other hand, someone who “takes all recolors anyway” said they would like creators to offer a merged version of their recolors [you can merge CC to reduce loading times using LazyDuchess’s CC Merger].
One person recommended avoiding just using “here” as hyperlink text, but instead describing what you are linking to, so that if the link gets broken we still have a chance to find the thing. In the same vein, they and another person advised against reliance on an image alone to give info about the download. As we know, images can disappear, and a Google search won’t lead to the item if your post has no text that Google can detect.
About the images that creators do show, one person mentioned a download not having a proper preview as their pet peeve. On previews, two people recommended that the piece of CC be clearly visible and the main focus. Two people said they like when a preview of the item is included in the archive (“helpful when looking through old CC”).
One person said they appreciate when creators give two download links to two different hosting platforms, in case one of them ever breaks.
One person asked for creators to always test their stuff before uploading [it should go without saying but we do see egregious things to this day]. Their pet peeve is “CC with obvious issues that can’t have been tested properly in game! Don’t just look at it in build mode or bodyshop, actually use the item in live mode. Have a Sim wear the clothing or use the object!” They pointed out as an example that some CC lights don’t light up. Someone else said: “if there are minor imperfections, that's ok! But let your downloaders know what to expect.”
One person said that they enjoy reading detailed descriptions of CC: “Share your inspos, what went wrong, tag the pieces you used if you are Frankenmeshing because I might want those items too! Creating and sharing is deeply personal, don't be afraid to share a part of who you are in your downloads if you feel comfortable doing so.” [If I may offer a slight counterpoint, I think detailed technical info + proper crediting should always be frontloaded. And then, in a separate paragraph, you can write about how you made this because your grandma used to wear something similar on those cool autumn days back when you were 6. But please, don’t expect your audience to have to parse through your life story to get the basic info they need to even understand what the download is.]
On subfolders: one person mentioned that they dislike when individual files are placed in subfolders; someone else said they don’t like many subfolders within an archive; a third person said that when downloading a ‘bulk’ CC pack, they dislike when each item has its individual subfolder (unless the object has dozens of recolors).
One person said they dislike downloads that include a large number of things that aren’t all part of a single coherent set.
One person said they dislike gift/mega packages that don’t give the possibility to pick and choose what you’re downloading.
One person asked that creators compressorize their CC, unless there is a good reason for not doing so, reason that should be stated [yes please! Use jfade’s Compressorizer, found on this page].
One person said they like when creators who make recolors give a link to the mesh they are recoloring whenever possible, even if the mesh is included.
One person mentioned appreciating when creators include base PSDs in their downloads [they were talking about hair specifically but I suppose it can be done for other things too].
About Bodyshop CC specifically:
Many people mentioned disliking when a piece of clothing lacks a fat morph (as one person put it: ✨“its literally bigotry”✨ [iconic]), or has a fat morph that's blatantly a quickly WSO’d afterthought. Someone said: “Absurdly shaped/clipping fat morphs that were most probably never tested in game before uploading are pretty annoying”; someone else said: “I make male content and am constantly flabbergasted by some of the UM Top fat morphs that make no attempt to align with Bottom items, or look completely ridiculous. [...] WSOs are a great starting point, but that's just it: a starting point" [I couldn’t agree more]. One person added that clothes should also have preg morphs.
One person really wants tooltips. Someone else further asked that creators give actually helpful tooltips to their recolors to make it easier to identify which recolor corresponds to which file [you can use CatOfEvilGenius’s Tooltip utility to give your recolors tooltips that correspond to their file names].
One person mentioned gaps in meshes being their #1 pet peeve [putting this in this section because I’m assuming they’re referring to Bodyshop CC].
One person asks that creators give their accessories unique BIN numbers to make them layerable with other accessories.
The same person would like creators to remember to delete the inapplicable ages in their accessories [this also goes for hairs].
The same person also appreciates when creators make custom thumbnails for their accessories, “especially for accessories that are not on the face”.
The same person said: “Accessories that are 'part of the sim' (like ears, tails, etc.) should be showerproof”. Another person had the same request: “Body part accessories (such as animal ears, tails, horns, wings) should be available for all types of clothing.”
One person appreciates when hair meshers specify if their hair is animated or not.
One person would like to see more hairs for toddlers and children.
For geneticized skintones, one person said they find it helpful when the genetic number is indicated in the file name.
About Build & Buy CC specifically:
Several people said they dislike when CC objects are set to an absurd price (like a couch for 1 simoleon) [this can be fixed with Pick’N’Mix’s Object Relocator], and two people added that they dislike when an object’s price isn’t congruent with their stats (like when an expensive bed has a low energy score). A creator further said: “whats worse is sometimes items are cloned from a very expensive item, and then the creator has reduced the stats shown in the description, but the bhav still has very high ratings, or sometimes it can be the other way around, an item might have been cloned from a cheap one, then their displayed stats are set to 10 but the bhavs still have low ratings”.
Three people said that they really appreciate when creators state which category their object is in and what the price is. One person said they appreciate when creators give info about how their object functions (“Is it just deco? Does it have hobby enthusiasm?” etc.). For complex objects, they like when there’s a video to show how it works.
One person said they dislike when creators place objects in categories that don’t make sense. Someone said more specifically that they like when objects are put in categories other than deco/sculptures or deco/misc.
One person said they dislike blank object descriptions or object descriptions that were left the same as that of the Maxis object that the piece of CC was cloned from.
One person said they don’t like when objects aren’t enabled for quarter-tile placement [can be fixed in simPe or with the Object Relocator].
One person said they dislike non-functional objects (like a sofa that’s a sculpture).
One person brought up two experiences they and their friend had with CC beds that didn’t have unique GUIDs and therefore would override other beds. In the same vein, someone else said they dislike when a creator forgets to mention that their CC is not custom but default and will override something in the game.
One person encourages creators to learn about the TXMT settings of objects (e.g. should an object be reflective?) and praised @pforestsims and @shastakiss for their CC in that regard. Another person said they dislike when an object is too shiny, which is also a TXMT setting.
One person said they dislike “transparent cut out textures”. [I quote because I’m clueless about this:] “I’ve seen this a lot on TS3 or other game conversions, where the texture has been imported without enabling transparency, and you get ugly squares around draw handles and such. Import the texture as DXT 5 and enable AlphaTest in the TXMT.”
One person said they like when 4t2 conversions have several subsets.
The Mac user among us would like creators to resize their walls and floors for Macs, otherwise they show up grey in game.
About lots specifically:
Two people said they like when creators show the floor plans of their lots.
104 notes
·
View notes
Note
Hi, random q. I saw in your tags that you swear by Scrivener for original fic. I’m still plugging away in ye olde Word and now I’m intrigued to know what about Scrivener you like so much. I’ve def heard about it but never used it, so I’m curious :)
YES I would love to tell you about my lord and savior software Scrivener. I hope you don't mind I published this long, long answer publicly.
So. The main issue I have with Word and Google Docs is that you hit a certain length/word count, and it starts to lag and load kind of jerkily. You know? Also, navigating chapter to chapter or scene to scene is awkward for me--you either have to have a whole bunch of individual documents and multiple windows open, or you have to use headers and the table of contents...which is fine for quickly finding chapters but less so for scenes within those chapters.
Messy, basically. Does not spark joy for me.
Enter Scrivener.
Now, before I evangelize a bit, I will say that Windows Scrivener and Mac Scrivener are not 100% created equal. They are both better, I think, than Word or Google docs, but the Mac version is a bit slicker and a little nicer to look at. I only say that for if you're using Windows, because if so my screencaps below won't exactly match what you see if/when you download the program.
ONWARD.
So, the #1 thing that Scrivener has over Word is that it's a one time fee, not a subscription. So while it is a little pricey (Just went and looked, $59.99 USD), it's only the one payment. All updates and such are covered and available as free downloads. I will also say that Scrivener gives you a 30 day free trial. That's not 30 consecutive days, but 30 days of use--if you only use it every other day, you'll have the trial for 60 days. They make it really easy to figure out if it's for you or not.
This is also going to feel like a lot, but there are built in tutorials and it's actually pretty intuitive, depending on how your brain works. Anyway! The basic gist of Scrivener is that it's a digital binder. You can keep all your book stuff in one place:

As you can see, there's the manuscript (aka my book), notes, research, more. Tbh, I mostly just use notes and Manuscript, but if it floats your boat, you can store maps, place names, worldbuilding, playlist links, moodboards, a whole ton of stuff, all in one menu that's easy to access and in a single window. You can organize it however itches your brain the best way.
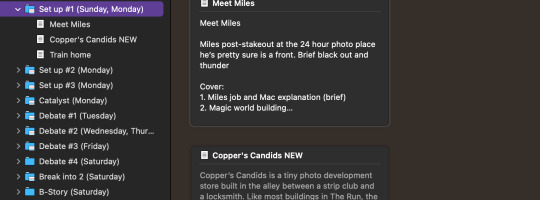
But like I said, for me, the best is that Manuscript part, which I'm going to go into now. I use a three act structure for books (but break the big ol' middle act into two pieces because it makes my brain happy), so each act gets a folder.
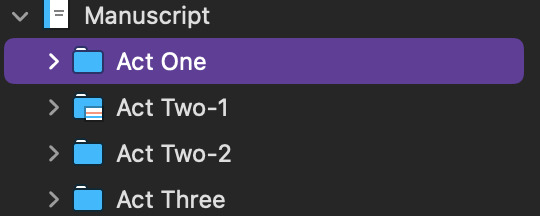
When I click and expand that act, each chapter has it's own folder. However, it also shows quick-reference index cards, so I can have an at-a-glance at what's going down in each chapter. (I'm using a outline system called Save the Cat for this book, which is why all my chapters have titles like 'Catalyst', feel free to ignore those...I also have a very compact timeline, so to help me stay organized, I labeled each chapter with when it happens.)

You can do the same with each individual chapter and the scenes, where when you click on the chapter folder, each scene gets a card. If you don't type in a summary, it'll just auto-populate the start of whatever content you were writing. You can see this in the 'Copper's Candids NEW' card.
And, of course, it is writing software. When you click on the individual scene, it opens the blank document, and you can get cracking.

So. This system is nice for a few reasons. My favorite is that it makes navigating, reorganizing, and/or rewriting scenes extremely easy. It's just point and click, drag and drop. You can also open two docs in the same window at once, like this:
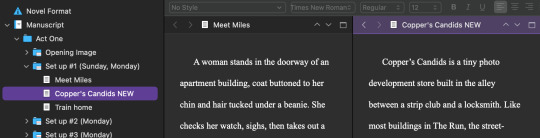
Which is a nice feature for several reasons--you can work on a new version of a scene with the old one pulled up next to it, or if there's something you wrote earlier or that comes later that's important to what you're working on now, you can have them both up for quick referencing.
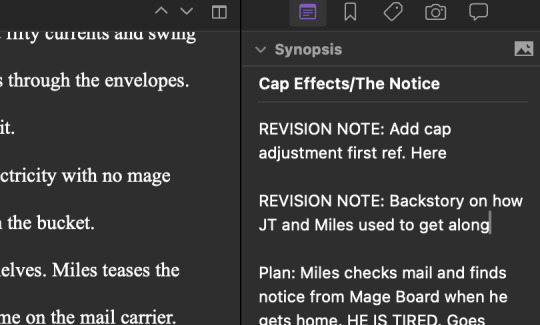
Another slick thing is each doc has a notes section off to the right side of the screen--which is optional! I use it for future revision notes/descriptions of how I want the scene to go:
My other favorite part of Scrivener is that it makes it very easy to hoard your deleted scenes like a deranged dragon in case you want them later. My garbage looks like this:

There are SO MANY FILES hanging out in my trash, and you know what? I so rarely actually need them, but my god am I glad they're there on the rare occasion that I do. Word, again, can make it more difficult. I always had a massive 'cut' document that was longer than the actual project and again, awful to navigate. This just makes it easier.
Scrivener also makes it easy to compile the manuscript into other doc types--pdf, doc, docx, etc--for easy printing and sharing.
ANYWAY. I'm sure there are approximately 1 million other things I'm missing, but basically Scrivener takes all your book/long project bits, puts them in one centralized file, and makes it super easy to navigate. I've also found that outlining is easier, because I can just make the folders and scenes and drag them around while I noodle through the plot.
10/10, would recommend to any long-form writer. If you have any other questions, please let me know! If anyone has read this far and has a thing about Scrivener to add, please do! I love Scrivener, and a lot of my writing buddies love Scrivener, and it really kinda has revolutionized the way I write original fiction. I'm always happy to yell about how great it is.
#mail#story-monger#long post#Scrivener#free yourselves from the shackles of Word and Google Docs my long-form-writing friends#there is a Better Way#writing
101 notes
·
View notes
Note
what are some of your fave solo amazingphil videos? ^_^
OMG AMAZING QUESTION!! where do I even begin LOL Xb
For classic AmazingPhil (pre manchester apartment) some of my favs are Worst Day Ever mainly cause the way he says "awful" is just perfect, No Sleep cause that purple shirt looked so good on him, Hayfever Sucks idk why tbh I just love it, 51 things in my room cause srsly how can he be so cool, Psycho Boyfriend okay actor Phil I see you, CLAW I love you Mrs. Lester <3, ♥ ♥ ♥ ♥ ♥ ♥ ♥ the way he says "ow" is so cute </3, Alarm he looks so good in this video, and Robot death machine psychic Phil at his finest (and for these ik they're not solos but the sprite advert and Jonathan and Mary Beth argue are srsly my favorite amazingphil videos they're so funny OMG)
Then when he was really starting to pop off (manchester apartment era) I love Things I thought were true that are not true its short its sweet and it made an amazing series, The Change another just banger plus "straight" Phil LOL, KILLER ESCALATOR is just so good "nostalgia face", and SIDEWAYS GARY cause like genuinely what did that guy even mean?!
Now it's time for like "stereotypical" AmazingPhil (1st london apartment): MAN FLU I love videos like this they're so comforting, Smoking Fail just a classic, LOST AT THE MALL ;_;, My Body Sucks, FIREWORKS FAIL, Phil's Favourites, OPTICIAN HORROR STORY, PHIL IN THE CLUB, I SMASHED 3 MIRRORS, 2017 WANTS ME DEAD, Reacting to my Baby Videos, BADGER SIMULATOR?? - Phil Plays: Shelter, SLENDER BADGER - Phil Plays: Shelter 2, THE RIVER OF DEATH - Phil Plays: Shelter 3, FOREST FIRE!!! - Phil plays Shelter FINAL EPISODE, and every sleepless night with phil. I could keep going but honestly I would just be linking to every video he made in this time cause they were all bangers.
Moving on to 2nd London apartment era: I Read A Letter from My Younger Self this video inspired me to also do this LOL, Reacting to my DELETED VIDEOS 1. QUIFF! 2. Phil's art house era eats, Why I Went To Hospital , Why I Went To Hospital (again) I love his medical videos I love how speaks about these topics, A Chat With Myself From 10 Years Ago, My Google Search History 2 just so entertaining, Reacting To Myself On A TV Quiz Show BANGER, Reading The Creepiest Email I've Ever Been Sent, Coming Out To You of course <3, Trying To Bake My Birthday Cake WITHOUT A RECIPE and underrated gem, I Tried To Follow A Festive Bob Ross Tutorial (gone wrong) so endearing AND AN EXTREMELY UNDERRATED VIDEO, I Tried Floating In a Sensory Deprivation Tank For 3 Hours, A Tour Of My Plants (living and dead) miss u jenna thank u for inspiring Phil to make this banger of a vid, Trying to Catch and Rescue An Injured WILD Pigeon COMFORT VID, Visiting My Hometown! (On Google Maps), and the Awkward Stories From the Closet series. THIS ERA WAS SO GOOD TOO <///3 I LOVE HIMMM
The Phouse Era: This era does not have many solo Phil videos and also not that many videos in general but there are a some bangers like Viewers Pick My Birthday Presents the mega dilf shirt is such a slay, I was mess at university, Exposing My TikTok Likes I love seeing him laugh, I have a confession he looks so good in pink, I made a construction worker cry, A New Era PHLONDE, Let's Talk About Dating...Again ginger quiff my beloved, and honestly all of the BitLife videos.
So those are some of my personal favs but who am I kidding all of his videos EAT!
HAPPY 19TH ANNIVERSARY TO THE AMAZINGPHIL CHANNEL OMG!! <3 <3
#oh shit i wrote a lot LOL#amazingphil#phil lester#i really hope i got all of the links right >_<#asks#god i hope this makes sense
17 notes
·
View notes
Text
Today on Hobbit-Headcanons:
What would the company of Thorin Oakenshield enjoy about the Modern World?
One of my WIP transports the company to our world shortly before they're supposed to reach Rivendell, and into the apartment of my OFC.
So here is a list of things I think each character would enjoy about the Modern World:
Thorin: Google Maps, Siri (will totally argue with her like she's real), Shows like The Crown, Game of Thrones, but also Bridgerton, Democracy (yes you read that correctly), Rock music
Fili: Birth Control (can finally fuck around without risking the royal lineage), Superhero Movies (has an huuuhe crush on Black Widow), Tinder, Martial Arts, Feminism, Henley shirts to show of his muscles, bars & clubs
Kili : TikTok (LOVES cat videos, Top Content Creator about Archery, 'deep thoughts'/rambling, 'prank my uncle/brother with me', does EVERY challenge, accidental thirsttraps & flustered by the comments), Parkour, Man Buns & (Hipster-) Fashion, LGBTQ+ - Community , karaoke bars, team sports, the zoo
Bofur: modern music (especially pop songs with dirty lyrics), Tumblr (is no. 1 shit-poster), music festivals, arts&crafts blogs, Christopher's Streets Day
Bifur: Google Translate, Modern Medicine, Pain Medication, ASL, RomComs (trust me), helps out in an animal shelter, country music
Bombur: Cooking Shows (has his own Online Show), Kindergarten (he had so many children, the reprieve would be SO appreciated), international foodstuff to try
Dwalin: Guns, MMF, store-bought cookies, sport shows (AGRESSIVE fan for whatever team he randomly picks), Barbecues
Balin: Twitter (the political possibilities!!!), mental healthcare (he's sending the whole line of Durin he had no time for their shit), Spa Days, public schools, classical music
Oin: Modern Medicine (Duh), hearing aids, physiotherapy
Gloin: bitcoins, the stock market, Facebook (posts daily about Gimli)
Dori: hair tutorials, fashion shows, tracking devices (has totally microchipped a drunk Nori at some point)
Nori: hacking, movies with the lovable rogue as the MC (Pirates of the Carribbean, Deadpool etc.), spy movies (duh), the mafia (yes, he becomes a boss within weeks)
Ori: Wikipedia, public libraries, tutorials for EVERYTHING (knitting, cutting your own hair, how to talk to royalty, fancy war cries, you name it), fantasy novels, public schools
Bilbo: Food blogs, the "ignore call"-button, Instagram, university (will mayor in at least three subjects), museums
Gandalf: the Internet as a whole, email/ instant messaging, yard sales, modern weed, museums (has a knack for finding cursed items), adventure movies (after watching Indiana Jones he seriously debated obtaining a whip)
#tolkien#the hobbit#middle earth#the hobbit fanfiction#thorin oakenshield#fili and kili#fíli#kili#bilbo baggins#bifur#bofur#bombur#dori#nori#ori#dwalin#balin#gandalf#oin#gloin#what if#tolkien imagine#the hobbit imagine
67 notes
·
View notes